BuilderPlus Documentation
Overview
Prerequisites
Before you get started creating your site using BuilderPlus, you’ll need to setup your WordPress environment. BuilderPlus requires WordPress v4.1 or greater. For more information on setting up you WordPress environment please refer to WordPress Codex “Installing WordPress” entry. If you’re experiencing difficulty setting up you WordPress install, you’ll need to contact your hosting company or your local system administrator.
PHP Configuration
If your server is running PHP v5.6, you will need to specify always_populate_raw_post_data = -1 in your php.ini file and reload your web server. This addresses a known bug with the default PHP v5.6 configuration. For more information on this issue, please see this blog post. If you find yourself unable to modify your php.ini file, please contact your hosting service or site manager.
Getting Started
Installing The Theme
- Unpack the zip that is retrieved from ThemeForest
- Navigate to
Appearance > Themes - Click
Add Newbutton - Click
Upload Theme - Click
Choose File - From the unpacked directory, select
builderplus.zip - Click
Install Now - Click
Activate
Note: If you encounter a style.css not found error on trying to install the theme, that means that the package you uploaded is the incorrect package. Make sure that you’re using the builderplus.zip file from inside the unzipped package (eg. <themeforest_unzipped_packaged>/builderplus.zip).
Install Required Plugins
BuilderPlus relies on a number of plugins to provide functionality. In order to install the plugins associated with the theme:
- Navigate to
Appearance > Install Pluginsin the admin dashboard - Check all the plugins in the list by clicking the top-left most checkbox in the table header.
- Click the
Bulk Actionsselect control, choose theInstalloption and click theApply - Click the
Return to Required Plugins Installerlink after receiving the “All installations have been completed.” - Check all the plugins in the list by clicking the top-left most checkbox in the table header.
- Click the
Bulk Actionsselect control, choose theActivateoption and click theApply - A notice
The following plugins were activated successfully: ...
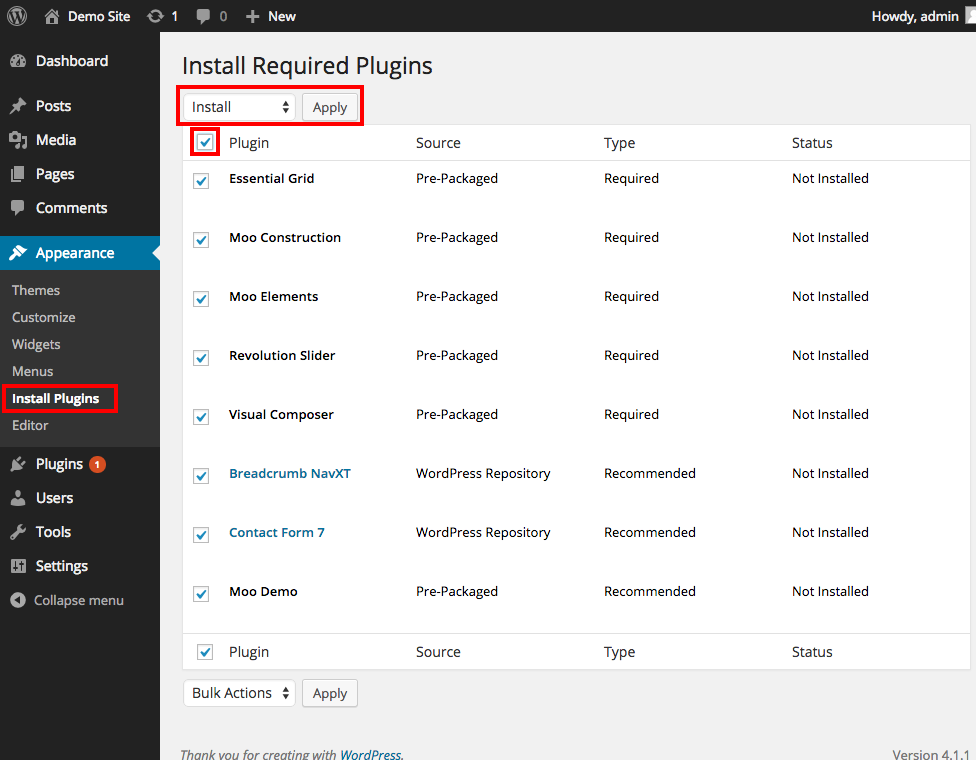 Install Required Plugins Page (Install)
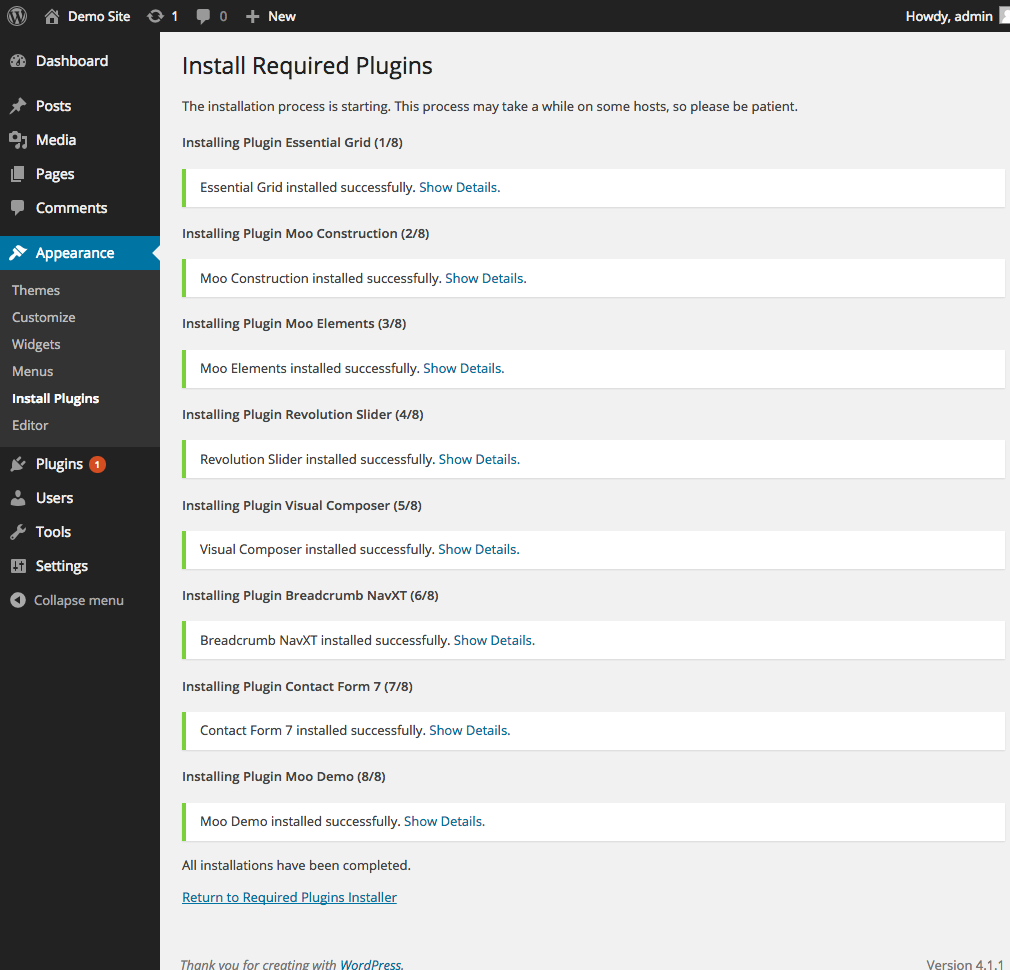 Install Required Plugins Page (Feedback)
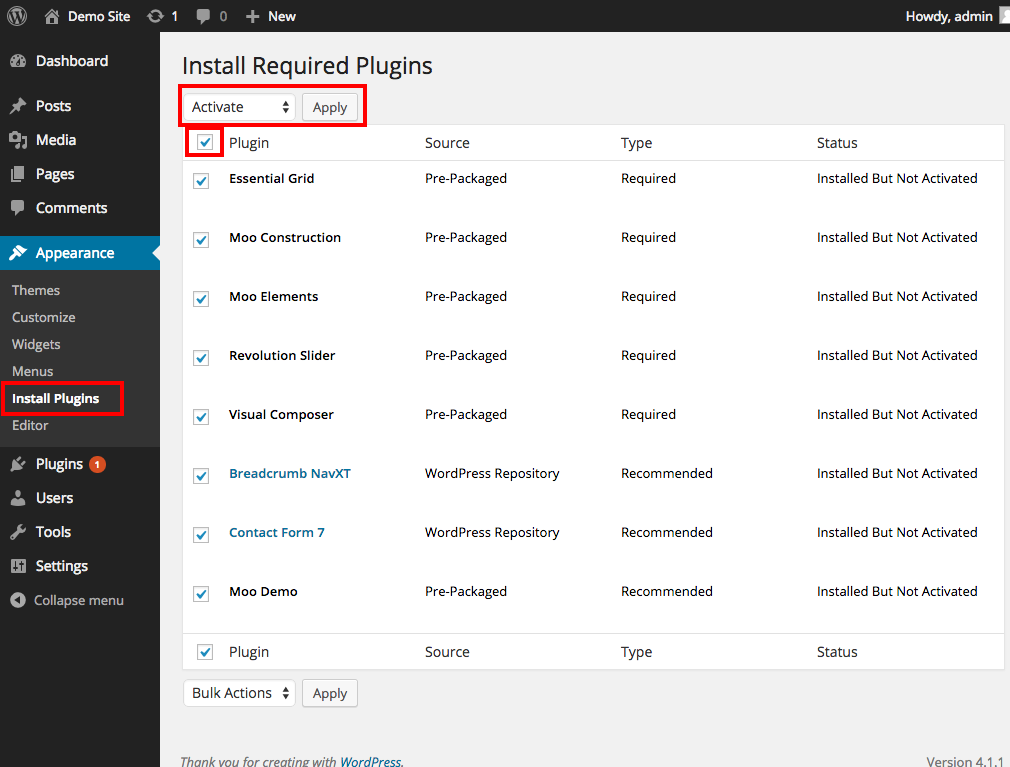 Install Required Plugins Page (Activate)
Using The One-Click Importer
Before using the one-click importer, make sure to INSTALL & ACTIVATE THE THEME & ALL OF THE REQUIRED & SUGGESTED PLUGINS. If you are planning on using a CHILD THEME, be sure to HAVE THE CHILD THEME ENABLED before running the one-click import.
The Demo Content Import populates and configures your site content with commonly used pages, posts, and custom post types. That way you can get a site up and working as quickly as possible just by editing the imported pages.
NOTE: The one-click import modifies settings and content on your site. Before running the one-click importer, be sure to backup your site. Additionally, it’s highly recommended that you only run the one-click import on your site only once. Multiple runnings of the one-click import will result in duplicate content.
- Navigate to
Settings > Moo Demo Importin the admin dashboard - Click the
Import All Contentbutton - Wait on the page until the feedback indicates that the import is complete.
- Your site will be populated and configured with demo content now.
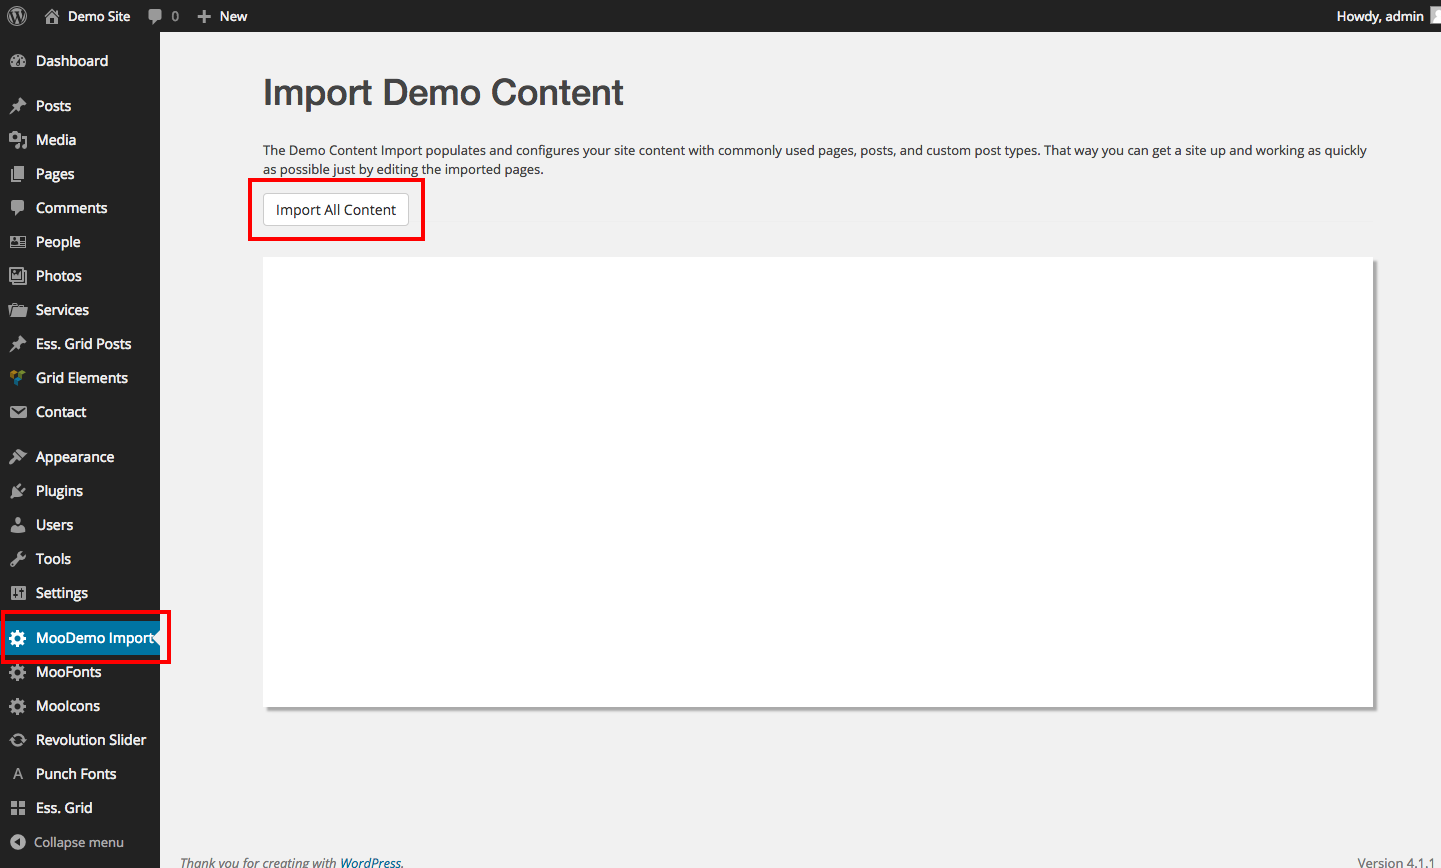 Demo Import initial page
Configuring Your Site
Widget Areas
BuilderPlus provides five widget areas. Blog Sidebar – is the sidebar that’s on the blog page. Footer Column 1-4 are displayed in the footer area. To modify the widgets displayed on the site:
- Navigate to
Appearance > Widgets - Click and drag desired widgets to appropriate Widget Locations
Google Fonts
Setting Available Fonts
Google Fonts provides a library of custom fonts that allow you to customize the font on your site. There are lots of Google Fonts, so you will need to select which ones you want to make available on your site. In order to select your fonts:
- Navigate to
MooFontsat the top level of the admin dashboard menu - If there are no fonts previewed on the page, click the
Refresh Font Listbutton in the top right of the page.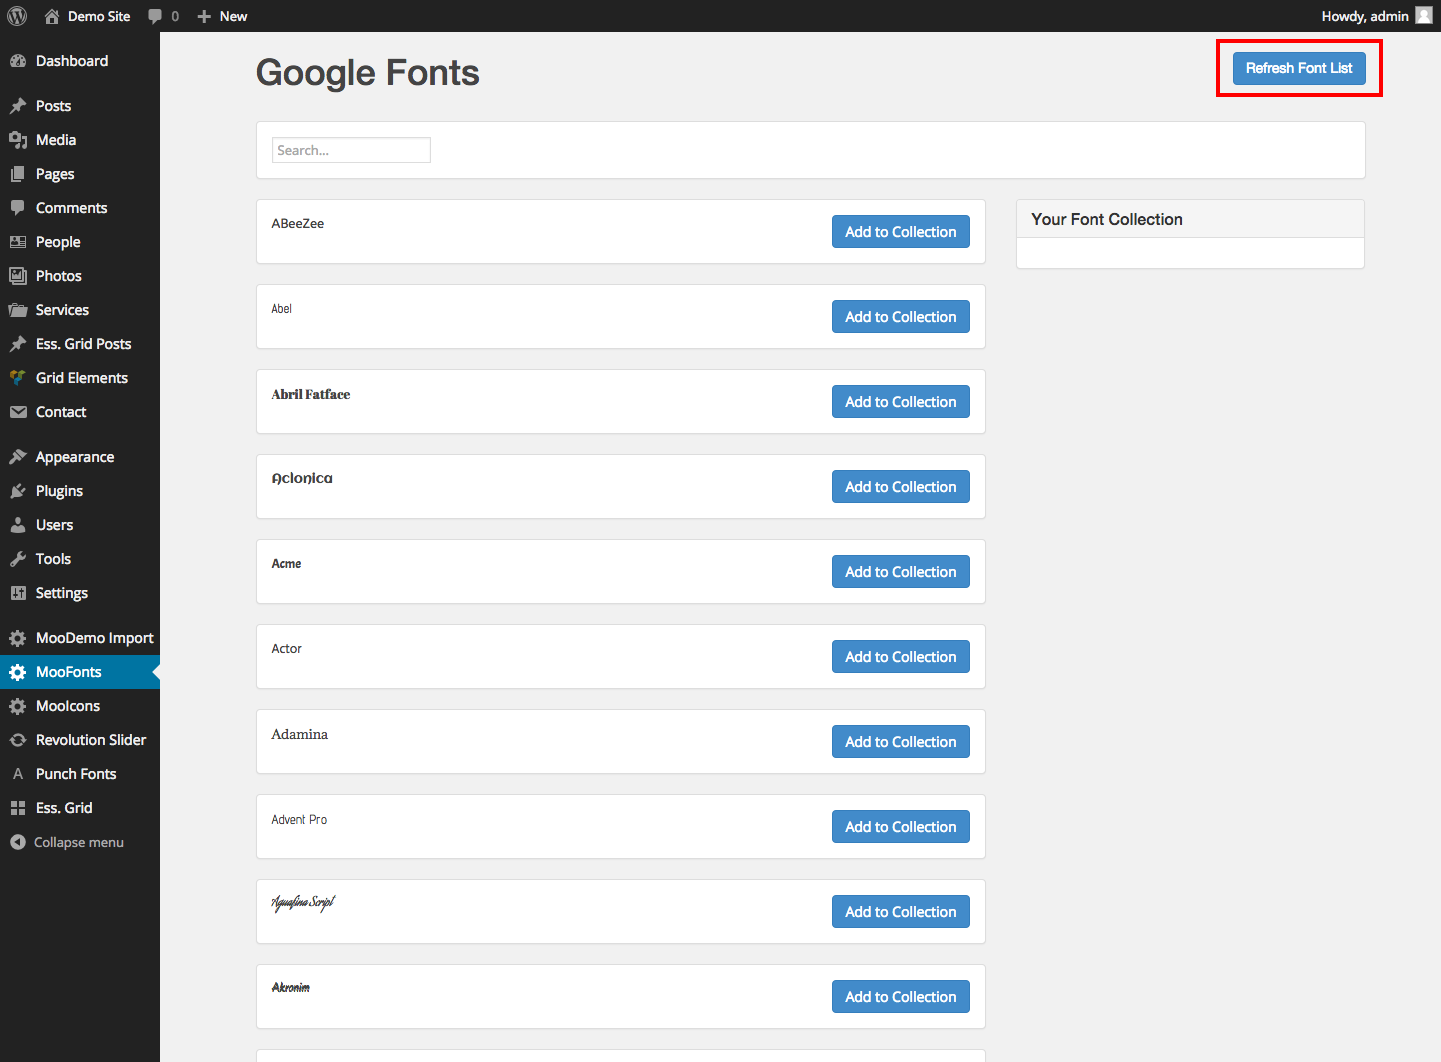
- Browse the fonts by scrolling up and down the page. If you have a particular font in mind, use the search box in order to filter the fonts.
- Once you’ve decided on a font, click its associated
Add to collectionbutton - This will add the font to the
Your Font Collectiondisplay on the right side of the page. - For the font you’ve added, select the font variants you want available on your site. By selecting the variant checkboxes and the clicking the associated
Save Settingsbutton. - The font & the selected variants will now be available on the site.
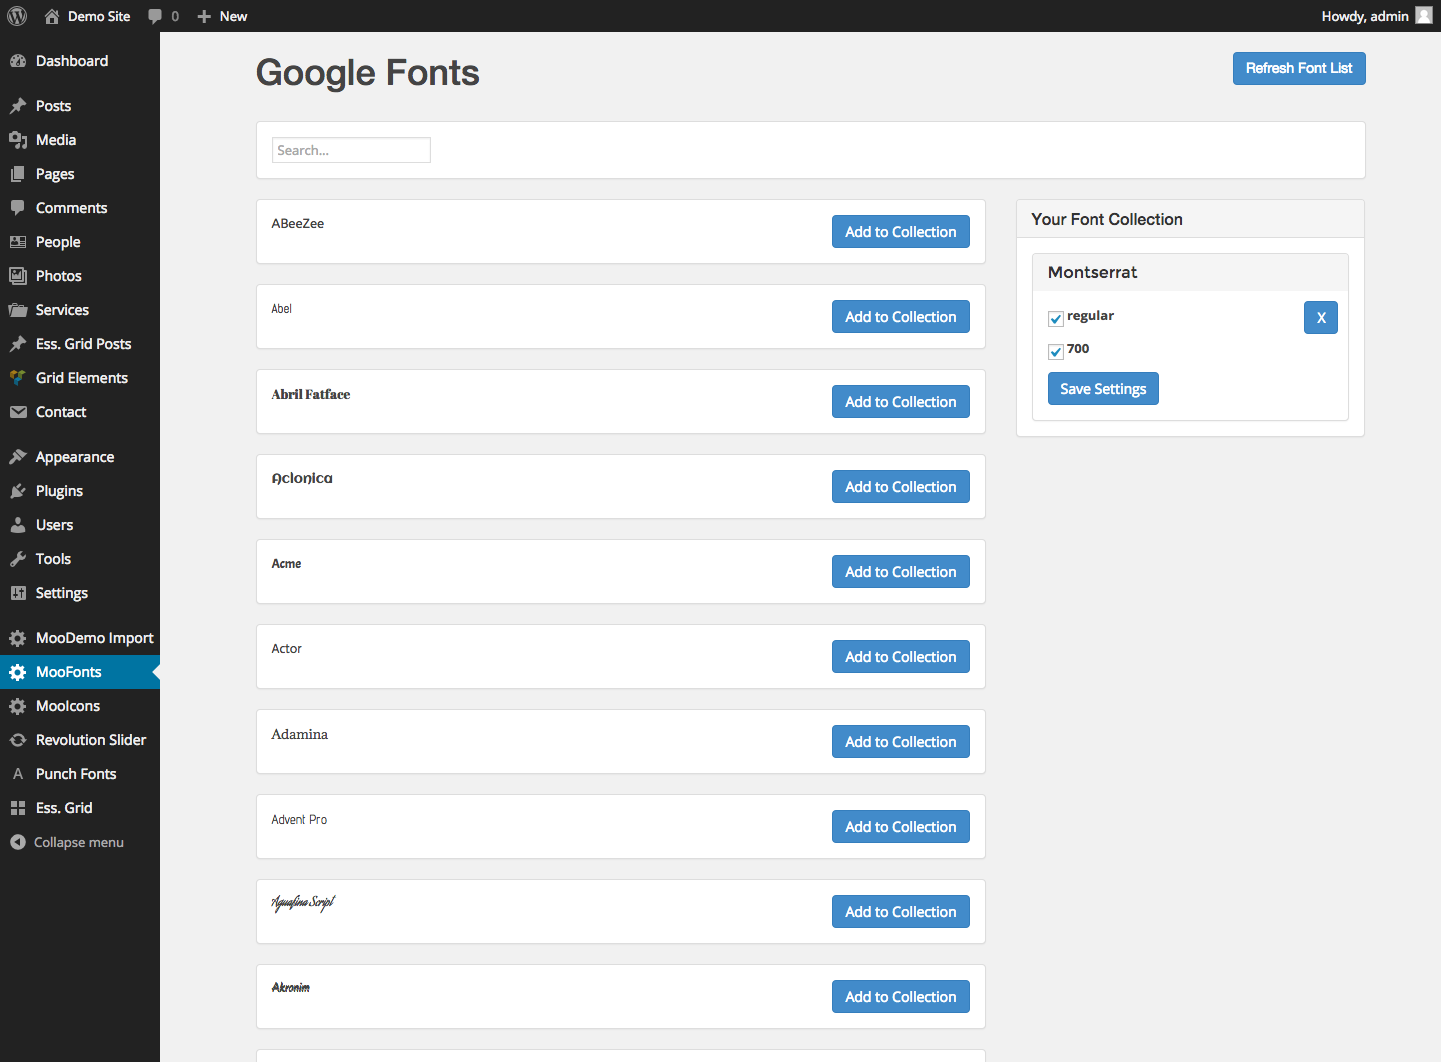 Populated Fonts
Configuring/Customizing Site Fonts
- Navigate to
Appearance > Customize - Click
Fontsto open the font options panel - Select the desired fonts in the
Heading FontandText Fontdropdowns - Click the
Save & Publishbutton to save the customizations - Now your site will have the specified fonts applied.
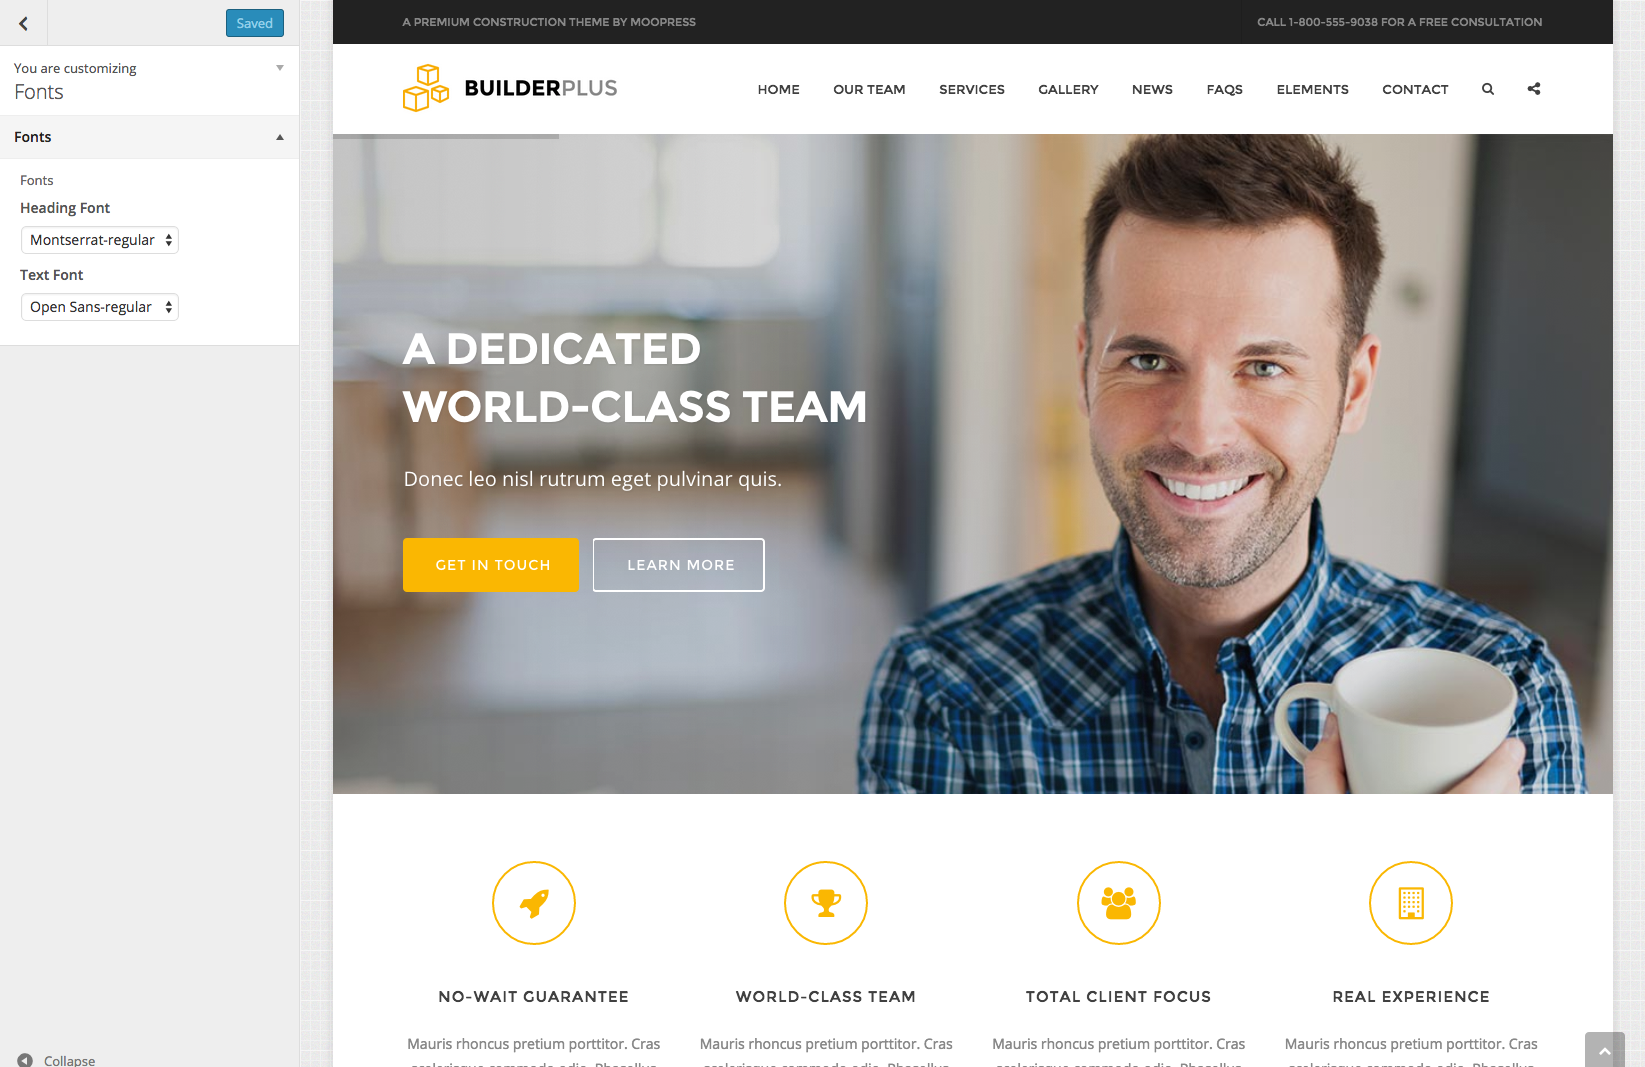 Customize Fonts
Icon Sets
A number of the shortcodes available when using BuilderPlus, involve icons. By default, the Font Awesome icon set is available for use with these shortcodes. In addition to the default icons, you can add icon sets from Icon Moon. Download a Font icon package from Icomoon. To import the package:
- Navigate to
MooIcons - Click the
Upload Icon Setbutton at the top right of the page - Upload your
iconmoon.zipfont-icon set - Click
Add Font Zip - The icon set will be displayed in preview in the Icon Dashboard. When using icon type shortcodes with Visual Composer, previews of the icon will be available for selection.
![]() Icon Dashboard
Icon Dashboard
Contact Form 7
Contact Form 7 is a plugin that allows for the creation of contact forms on your website. The one-click demo install automatically imports contact forms on to your site. However, before they’re ready, you will need to modify the forms so that they send email to your specified email. To edit a contact forms destination email:
- Navigate to
Contact > Contact Formsin the admin dashboard - Click on the title link of the contact form in the list of forms
- Locate the
Mailmetabox on the contact for edit page - Edit the
Tofield. - Click the
Savebutton to save your change
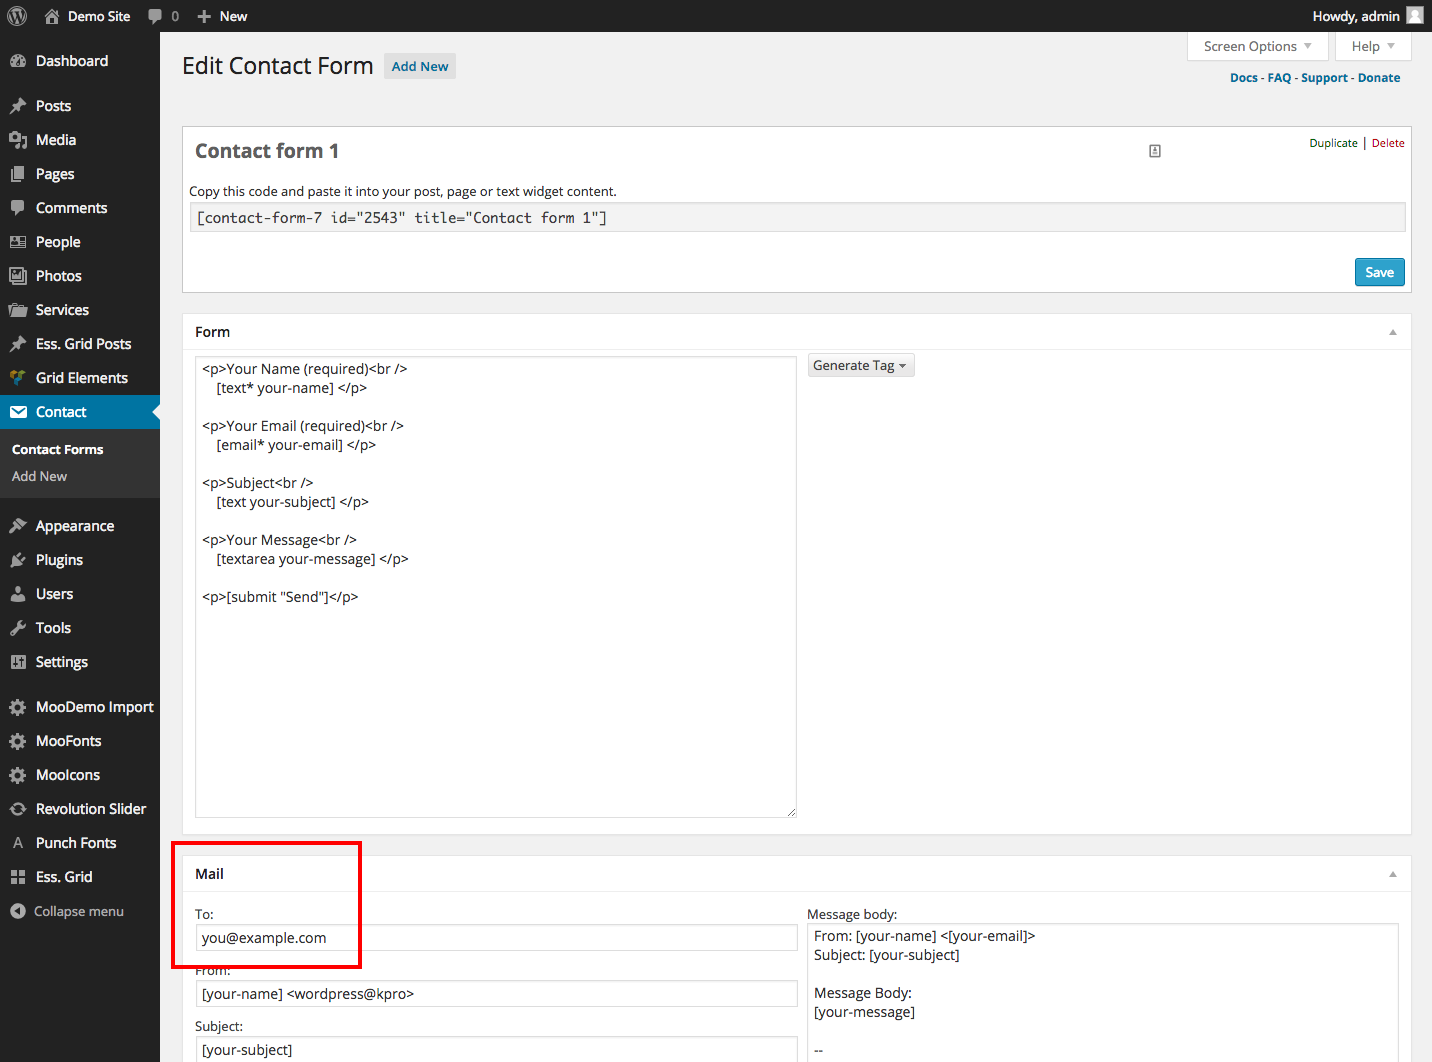 Contact Form Edit Page
NOTE: Configuration of email sending is not controlled by BuilderPlus. If your site is up and running but not sending email, you will need to contact your hosting provider in order to configure and troubleshoot your email sending system.
Customizer
BuilderPlus provides its site options through the WordPress Customizer. To access the customizer, navigate to Appearance > Customize in the admin dashboard. The options that are added by BuilderPlus are organized into panels that can be accessed by clicking on the headers associated with the panels.
Customizer Options
- Fonts
- Heading Font – The font that should be applied to headings
- Text Font – The font that should be applied to general text
- Header
- Header Logo
- Logo – The image to use for the site logo that appears on the left side of the header
- Logo Width – The width of the logo element in pixels
- Logo Height – The height of the logo element in pixels
- Logo Top Offset – The top offset of the logo element in pixels
- Logo Left Offset – The left offset of the logo element in pixels
- Header Logo
- Page
- Page Body
- Page Background Color – The default background color of pages on the site
- Site Accent Color – The color to use for accent elements across the site
- Page Body
- Blog
- Blog Title – The text to display in the subheader when viewing the blog or single post pages.
- Authored by text – The text to prefix displays of the author in the blog
- Posted On – The text to prefix displays of the posted on date
- Footer
- Subfooter
- Copyright Text – The text to display in the copyright section of the subfooter
- Subfooter
Editing Content
Revolution Slider
- Click the
Revolution Slidermenu item in the admin dashboard - In the
Revolution Slidersmetabox- Locate the
Fullscreen Sliderslider - Click the blue
Edit Slidesbutton next to it
- Locate the
- For each slide
- Edit the Heading
- Edit the Subheading
- Change the link location of the button by editing the
hrefattribute of theaelement - Change the background image
People Profiles
- Navigate to
People > Departmentin the admin dashboard - Use the
Add New DepartmentForm to create all the applicable departments - Delete the demo departments
- Navigate to
People > Peopleto see the list of demo person profiles - For each Person in the organization:
- Click the
People > Add Newmenu item - Enter the name of the person as the title (ex. “Dr. John Doe”)
- In the TinyMCE editor, enter the bio of the person
- In the
Excerptmetabox, enter a short intro to the person’s bio - Fill out the fields in the
Person Profilemetabox - Use the
Departmentmetabox to choose the person belongs to - Use the
Featured Imagemetabox to upload a headshot of the person - Click the blue
Publishbutton in thePublishmetabox
- Click the
- Navigate to
People > Peopleto see the list of person profiles - Delete the demo person profiles
Photos
- Click the
Photosmenu item (in the admin dashboard) to see a list of demo photos - For each Photo
- Click the
Photos > Add Newmenu item - Enter the title of the photo
- Use the
Featured Imagemetabox to upload the picture - Use the
Tagsmetabox to enter appropriate tags for the photo - Click the blue
Publishbutton
- Click the
- Navigate to
Photos > Photosto see the list of photos - Delete the demo photos
Testimonials
- Click the
Testimonialsmenu item (in the admin dashboard) to see a list of demo testimonials - For each Testimonial
- Click the
Testimonials > Add Newmenu item - Enter the name of the person giving the testimonial as the title (ex. “Mr. Sundar Pichai”)
- Enter the actual testimonial into the TinyMCE editor
- Use the
Featured Imagemetabox to upload a headshot of the person giving the testimonial - Use the
Testimonial Metato enter the name of the company that the person works for (optional) - Click the blue
Publishbutton
- Click the
- Navigate to
Testimonials > Testimonialsto the list of testimonials - Delete the demo testimonials
Services
- Click the
Servicesmenu item (in the admin dashboard) to see a list of demo services - For each Service the practice offers
- Click the
Services > Add Newmenu item - Enter the name of the service in the
Titlefield - Enter a detailed description of the service in the TinyMCE editor
- In the
Excerptmetabox, enter a small summary of the service - Use the
Featured Imagemetabox to upload a picture relevant to the service - Click the blue
Publishbutton
- Click the
- Navigate to
Services > Servicesto the list of services - Delete the demo services
Homepage Content
- Click the
Pagesmenu item (in the admin dashboard) to see a list of all demo pages - Locate the
Homepage and click the page title to edit it - Just under the
Titlefield and above the TinyMCE editor, locate the dark blue toolbar - Click
Frontend Editorbutton in the toolbar - Edit the first row, first column
- Change the heading text
- Change the description text
- Edit the first row, Icon List Items. For each item
- Change the heading text
- Choose a different icon
- Change the main text
- Scroll down and locate the “Advanced Services” row
- Edit the introductory text
- Click the blue
Updatebutton on the top right of the page - Click the
Xin the top right of the page to exit
Contact Page Content
- Click the
Pagesmenu item (in the admin dashboard) to see a list of all demo pages - Locate the
Contactpage and click the page title to edit it - Just under the
Titlefield and above the TinyMCE editor, locate the dark blue toolbar - Click
Frontend Editorbutton in the toolbar - In the first row, first column:
- Edit the text just below the “Get in Touch” heading
- In the first row, second column:
- Edit the heading so it spells out the name of the practice
- Edit the address
- Edit the link URLs of the social icons
- In the second row, edit the marker location of the Google Map element
Page MetaBox Options
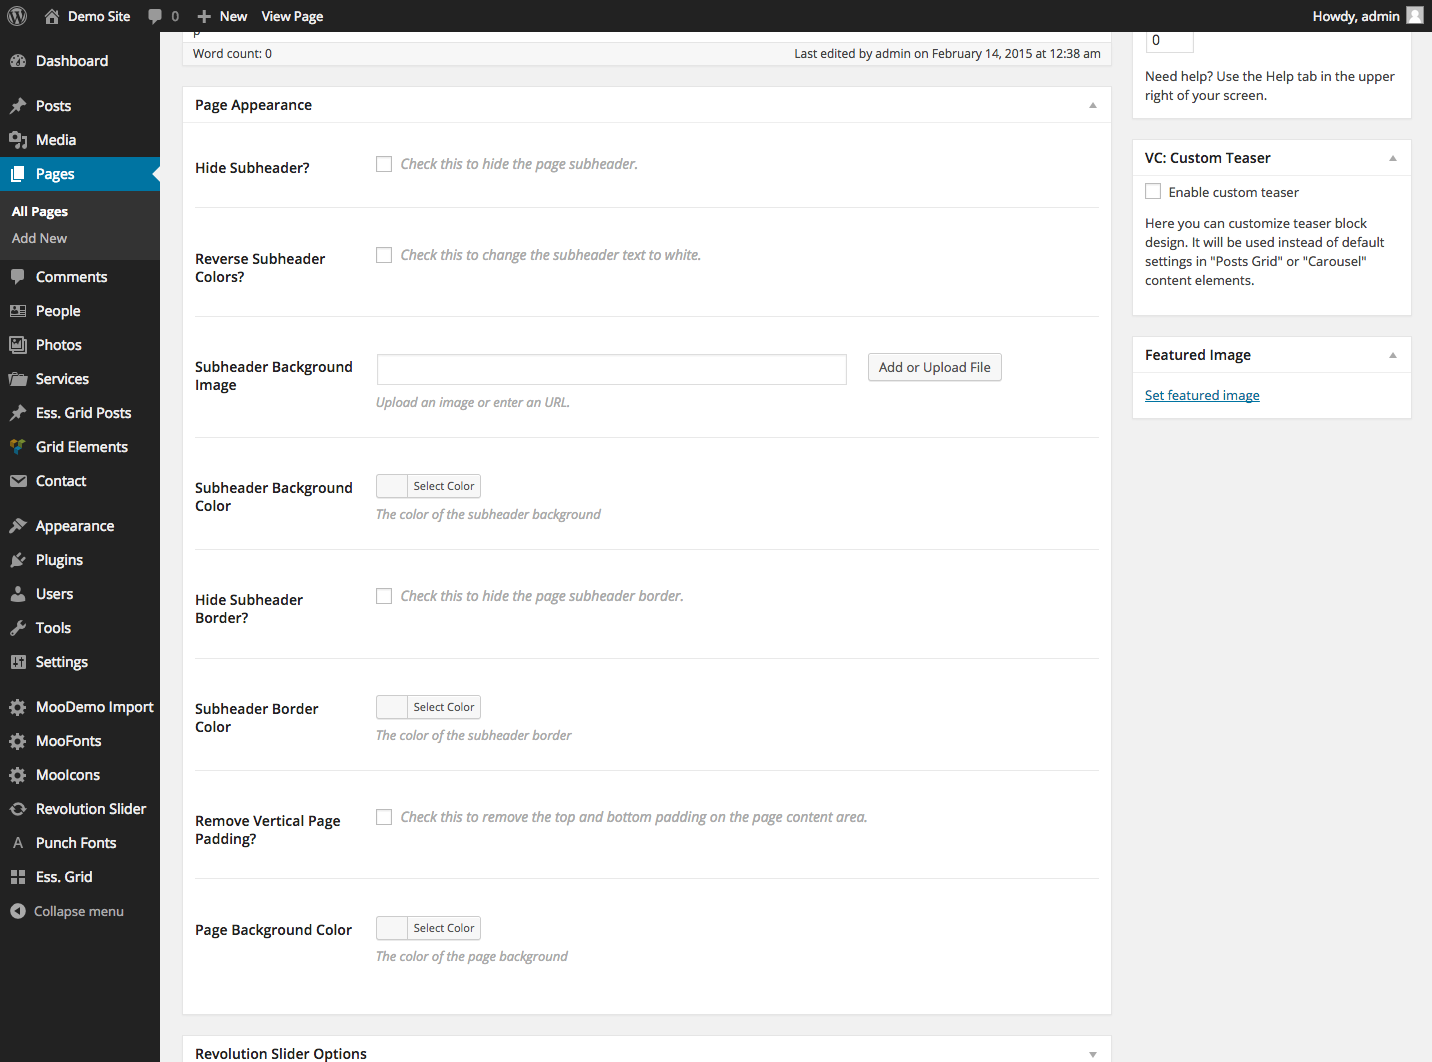
BuilderPlus provides a number of page level options to customize the look of individual pages:
- Hide Subheader – hides the subheader page element
- Subheader Background Color – sets the background color of the subheader element
- Subheader Border Color – sets the border color of the subheader element
- Remove Vertical Page Padding – will remove the top and bottom padding of the page content area
- Page Background Color – this option will override the site page background color customization option with whatever color is set.
Page Templates
BuilderPlus supplies three page templates:
- Full Width – a full width page template that has no sidebar
- Left Sidebar – a page with a left sidebar
- Right Sidebar – a page with a right sidebar
For general information on page templates and how to use them in WordPress, see the WordPress Codex Entry.
Shortcodes
- Animation Block –container shortcode. You can include arbitrary content inside it and set entrance and hover animations to be applied to the content. For more details, refer to the Animation Block section below.
- Counter – will count up to a provided numeric value
- Google Map – displays a google map. This is also a container shortcode that accepts Google Map Marker shortcodes as content.
- Google Map Marker – Used inside the Google Map shortcode to define map markers and the content displayed when they are clicked
- Icon Block – A div element that displays an accompanying icon
- Icon Box – A box that displays an accompanying icon
- Icon Link – A link that displays an accompanying icon
- Icon List – A list that displays icons by list items. This is a container type shortcode to accommodate
- Icon List Item – Used inside Icon List to define list item icons and content
- Icon Button Outline – an outline style button with an icon displayed in it
- Icon Button Solid – a solid style button with an icon displayed in it
- Styled Divider – a styled horizontal divider for splitting up sections
Modifying The Theme
Direct code modifications of BuilderPlus are highly discouraged. The recommended way of making modifications to the theme are through the usage of a Child Theme.
Child Theme
If you are unfamiliar with the concept of a child theme, please refer to the WordPress Codex entry on Child Themes. PHP & CSS edits should be made through a child theme. A template child theme is included in the theme package (downloaded from ThemeForest) inside the resources directory of the unpacked package.
Note: WordPress stores theme customizations on a theme by theme basis. If you’ve made used the one-click demo or edited the theme customization options with BuilderPlus as your theme instead of your child theme, you will need to export and import your customizations using the Customizer Import/Export plugin.
Miscellaneous
Permalink Settings
The recommended permalink setting for use with BuilderPlus is the Post name default setting in the Settings > Permalinks page in the admin dashboard.
Translation
BuilderPlus supports Translation through conventional WordPress translation method. For the translation template for the theme see the theme directory builderplus\lang\builderplus.pot. For more info on translating with WordPress, see the new WordPress Handbook entry on translation.
Support
All MooPress support is provided through our Support Ticketing System. Please visit and submit a ticket if you can’t find an answer in this documentation.
Finding your purchase code
To submit a ticket, you’ll need your theme purchase code. To retrieve it:
- Navigate in your browser to your ThemeForest Downloads page
- Find the BuilderPlus entry
- Click the
Downloaddropdown and clickLicense certificate & purchase code (text) - Open the downloaded
txtfile. - Locate the
Item Purchase Code:entry which displays your purchase code

